Sunday, July 20, 2014

Addition and Subtraction Math Facts

Hey there! As I've been filling out my lesson plan book for next year (Mine looks something like THIS from Erin Condren) I decided to go ahead and start working on a few things my kiddos will certainly need extra help with this upcoming school year. 

(For the record, at this point I'm writing on sticky notes in case my schedule changes and I don't have math first again this year... but fingers crossed I will!) 

So anyway, the kids always have a few weeks of easy-peasy-firstie-squeezy stuff like even/odd numbers and skip counting toward the beginning of the year. One thing I've noticed though, is that when we add and subtract to 20, most kids don't really go above 10+10 {Yes, I know that's technically 20 but what about 11+9? and 12+8!?!} So I created a set of flashcards/centers/workstation activities/whatever-you-want-to-call-them to help my students review basic facts ALL the way to 20. 
You can find it here at my TpT store. 


It comes with 48 addition problems and 48 subtraction problems, as well the answer cards (for matching activities) in both math cubes [unifix cubes] and 10-frames. I created the cards so that both sets {addition and subtraction} have the same 48 answers so you can use whichever answer cards best suit your group. I'm printing multiple copies of them so a) all of my kids can do this at the same time and b) some groups will use manipulatives in lieu of {or in addition to} the answer cards. I've also created a pretty awesome powerpoint on the different ways to teach adding and subtracting (along with a pre-assessment for each and a test!) but I'm going to wait and post it after I teach it, in case my guinea pigs students need extra help or the wording doesn't quite work on all of it. When that happens, you all will be the first to know!

Have a great week <3


Wednesday, June 4, 2014

Some of my favorite TpT products

Hey all! I've been hard at work during my first week of summer vacation painting shelves for my classroom and creating a super cool banner that I'll share when finished, but I thought I would check in and share a few awesome products I've discovered from Teachers Pay Teachers that other primary teachers might want a heads up about. Here are my top 5:

1. Junie B. Jones Aloha-ha-ha Literacy Activities by Leslie Ann

Scholastic Book Clubs had Junie B., First Grader Aloha-ha-ha on sale for only $1 so I bought a class set for the last week of school. I printed out Leslie's awesome activity pages and had them bound into a booklet for each student with a blank cover. As we read the book together the students would pause at the end of a couple chapters to fill out the corresponding pages. Considering it was the last week of school (think Field Day, Awards Day, packing up for the summer...) the kids did an AMAZING job staying focused. After they finished the book they completed the word search and then drew a new cover on the front of their (up until then) blank activity book.

If you haven't read much Junie B., I highly suggest you do! I swap reading with the kids (I'll read a page, then call on a student to read) and they fell in love with Hawaii and Junie B. this week. Several of them wanted to borrow another Junie B. book to read at home! She's a hoot!


2. Deanna Jump's Interactive Reading Journal
Even though Virginia is not Common Core aligned, this resource was invaluable to me throughout the year when I needed quick assessments of how well my kiddos were understanding reading concepts. The year had already begun when I found her products so I didn't have the kids start their own journals. Instead I had the kids glue the foldables onto construction paper so they could be hung in the hallway when complete. By the end of the year they were professionals with the cutting and folding techniques. It was also a gem to have when I was out with foot surgery and wasn't able to come back as soon as I had intended... The copies were already made so my sub could simply pull a themed book and the students could tell/show me what they'd learned. SO EASY!!


3. An awesome math center (that received LOTS of attention throughout the year) were the Balancing Act Task Cards from The Puzzle Den.
A parent volunteer cut these out for me (so sweet!) and my kids, at any and all opportunity they had, worked on balancing equations in their spare time. Number sentences were a difficult concept for many of my babes this year, but by seeing the numbers come alive they quickly began to understand how to balance equations and find missing addends. This product literally taught my math unit for me ;-).


4. My kids adored this Mystery Mini Unit by the fabulous Amy Lemons.
It can be used with any book, so I used it to introduce A-Z mysteries for my budding chapter-book lovers. Each student was given a copy of The Castle Crime by Ron Roy during our Dr. Seuss Day celebrations, so each student followed along. I created detective notebooks for each student (half-sheet sized, 6-ish pages) using her templates and the kids made a list of suspects, clues, and solid evidence as we read the book together. My kiddos thought this was SO much fun... they were begging to read another A-Z mystery afterward. Luckily I have the whole set!


5. Luckey Frog created an awesome Fluency Folder that I found near the end of the year.
I printed out the entire thing for myself, and then a few pages to put in each student's individual folder as we practiced and graphed and learned in-depth about good reading over the last 6 weeks of school. I timed each student on Monday reading a passage of my choice (I used a passage from Harcourt Storytown leveled-readers) for one minute, and then they took a copy home to practice reading to/with a parent each night. On Friday, they would read me the passage again and I would brag about how much they had improved (and yes, it's true!) It was also a great example for my one little, uh (what's the sweet word for 'slacker'?) munchkin who didn't feel homework was necessary. When he saw everyone else's graph jump by 30+ words each week and his grew by only 5, he quickly understood the need to practice reading to become a better reader. I think his mom saw it, too.

So there you have it. I bought and sold a LOT of stuff this year, but those are a few quick products that can quickly make a HUGE difference in the classroom without a lot of prep. My best seller continues to be my Fantastic Mr. Fox (by Roald Dahl) book study, with my Cookie Erosion Experiment a close second.


Sunday, May 25, 2014

Mummification Project

Back during the winter while learning about Ancient Egypt, we had a LOT of snow days. Great for naps, not so great for getting in everything that needs to be gotten in. Now that we're down to less than a week of school, I've been pulling out some of those fun things we had set aside and letting the kids review what we learned this year. 

One such project was creating mummies using strips of plaster and barbie dolls. We only had 3 dolls (that one of my lovelies was gracious enough to donate to the project) so I split the class into 3 groups. Each person was assigned a task.

First, they had to cut all of the hair off. (This was seriously the best part for one of my kiddos. As she was cutting I heard her giggle and whisper "I've ALWAYS wanted to do this!") 


The next step was to actually wrap the doll in the plaster strips. If you're curious, the plaster just kind of appeared on my desk one day a couple years ago with a note saying 'I thought you might could use this for something.' If I ever run out, or if you'd like to buy some, it basically looks like this. Mine came in a box, not a roll, and I had to trim the strips into smaller strips (about 1"x12") for the kids to work with. I gave them each a plastic bowl filled with water and strips and let them have at it.  (I didn't get any pictures of this due to me constantly checking to make sure they were doing it right!)

When completed, we left them in the window to dry.


You can see that some did better than others, but it was definitely a cool project all-around. If we had more time, I would love to use the clay leftover from our Pueblo necklaces (American Indians unit) to create sarcophaguses. That would be to die for!


Ice-Cream Float Experiment


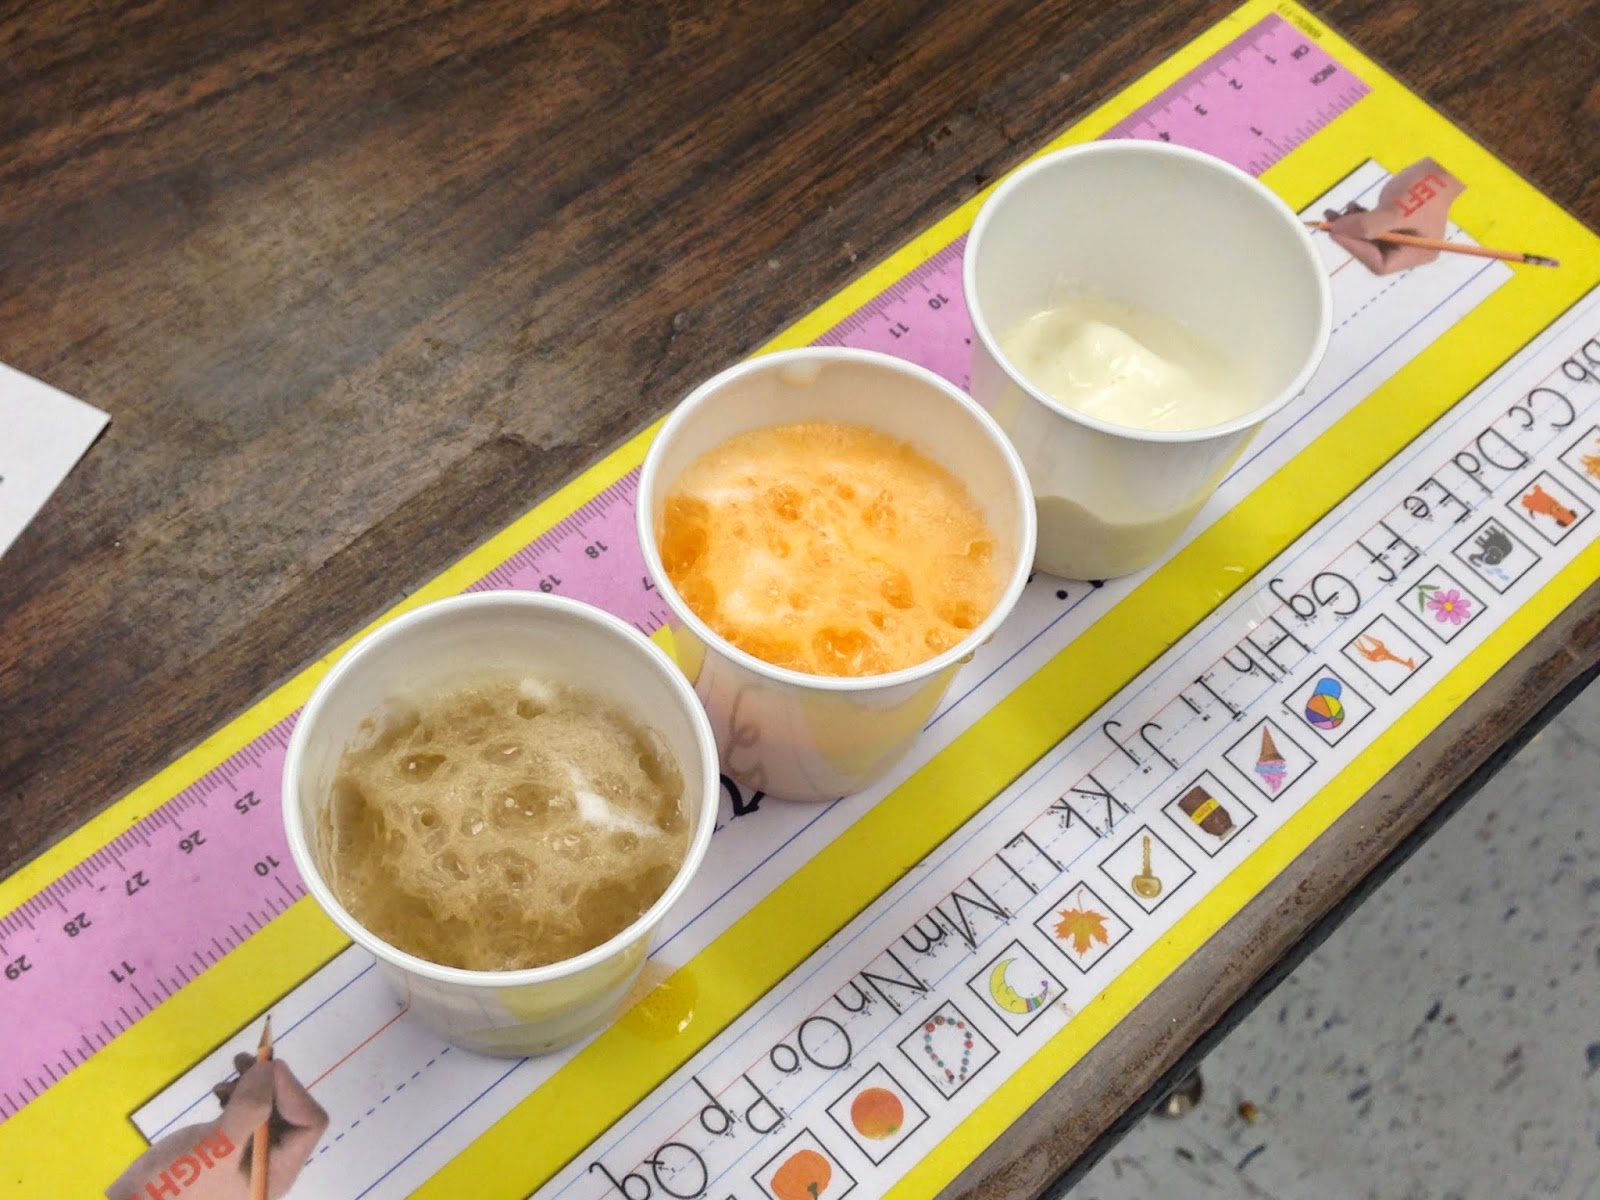
At the end of the school year I love to do experiments with my kiddos since we're trapped in our classrooms for state-tests happening in the building and we're finished the main curriculum and ready for review. I created this Ice Cream Float Experiment to do that takes just a little prep but involves a lot of fun while we review Scientific Investigation. It also happened to be one of my students' birthday, so his mom volunteered to bring in the materials! #iheartnoprepexperiments 


Each student was given a small cup with a bit of vanilla ice cream scooped into each one, and we poured 3 beverages (coke, orange soda, and lemonade) to determine which creates the most foam. As it turns out, the coke and orange tied #blamecarbonation so next time I'll likely use coke, tea, and lemonade. 


After they finished filling out the chart (they had to record the data, of course!) they had a bonus question (does anyone else's kids LOVE the bonus box on worksheets?!?) where they solved a less-scientific question: which one tastes best! My students loved this activity and it was a perfect Friday afternoon something-to-do. 


You can download the experiment sheet for your own kiddos at my TpT site for free! 


Monday, March 17, 2014

Dr. Seuss Day "If I Ran the Zoo"

Thanks to the wild weather we've been having our school had to reschedule Dr. Seuss day twice! Third time's a charm, though, and last Monday we were finally able to dress up and celebrate. Our Reading Committee assigned a Dr. Seuss book to each grade level, and we rotated rooms throughout the morning so our kiddos could do activities that went with each book. Such fun!

We started out in the First Grade rooms with Yertle the Turtle. Each student made a turtle out of paper plates, then my class formed two teams to stack their turtles. The team with the highest stack won! Afterward, we tried to stack ALL the turtles into one big stack, but it didn't work so well due to the rule "You can only place it once, so be careful setting it down!" lol!

Next we went to the Cafeteria, where our librarian gave each student a freeze-pop and they watched The Sneetches on a projector. The school had bought each student a book and gave those out, too! 2nd Grade received The Castle Crime, an A-Z mystery chapter book. (We're reading in class, now, using Amy Lemon's Mystery Unit activity book. But I digress...

We then traveled to Third Grade, where we created our own bird eggs from Scrambled Eggs Super, and each kiddo pulled three index cards out for their new bird type. Then they drew a picture of what sort of bird might hatch from their egg.

In the Fourth Grade rooms the kids had to put on socks as mittens and try to pick up 3 plastic counters off the floor and put them in a bucket, relay-style. This was to go along with one of my favorite books, Fox in Socks. I especially loved this station because some of my kids who typically excel struggled a bit, whereas several of my lower-average kiddos were the shining stars. Not sure why, but I enjoyed watching the glow on their faces when they beat "the kid who is good at everything." Of course I didn't say any of this, it was just the thought in my head!

Anyway, then we went to the Fifth Grade rooms and used our hands to paint Thing One/Two (blue handprint for hair, red handprint for body) and then decorate circles for their face and name on the body. They enjoyed this a lot, and I played beanbag toss (into a trashcan decorated to look like a red and white striped hat) once the kids finished painting. This was for the book The Cat in the Hat, obviously!

We made our way outside and back in through the Kindergarten entrance, for One Fish, Two Fish, and the kids each received a small bag of colored goldfish crackers they had to graph and answer questions about. I loved how that was a math skill we were revisiting without them even realizing it. They also go to estimate how many goldfish crackers were in a jar- and one of my kids won 2nd place for the entire school!

The last stop we made was back in our 2nd Grade class, where we traced our hands and used the picture to create our own animals for If I Ran the Zoo.

Two weeks prior (before the first Dr. Seuss Day was snowed out) our kids decorated our hallway with their own animals. It was a blast!


Our kids always dress up for the special day, and this year our team had a request- we asked all of our kiddos to dress as animals (real or fictional) and my co-teachers and others on our hall went as the Zookeepers! I used a white button up shirt with a black cardigan for the top (It was supposed to be in the 20's on the original day, but on our new date it was SO hot in the mid-60's!!!) and I found the striped pants online. They were a little baggy, but I also had on my black shiny teaks for the shoes. My sister let me borrow a red cloth belt to make the tie, and I ordered a captain's hat online and painted it red, then stuck a sign that said "Zoo" on the front. I wish I had taken off my name badge for the picture, but, oh well! I think it turned out pretty cute. I'm not sure I will EVER find another time to wear those pants, but they were too perfect to not wear.



Sunday, March 16, 2014

Follow my blog with Bloglovin

<a href="http://www.bloglovin.com/blog/9951649/?claim=xsnefv798rd">Follow my blog with Bloglovin</a>


Monday, February 17, 2014

Helen Keller Braille Bulletin Board

My kiddos just finished our Famous Americans unit. I always love seeing which students gravitate to each as their "favorite." This year LOTS of my babes enjoyed Helen Keller, so one day we had a few extra minutes so I decided we could expand a little about what Braille was, exactly. First I wrote out each of their names in braille using tiny black circles for each letter. They put a dot of glue in each spot and the next day they could feel the letters in their name. 


I also gave each of them 4-5 circles (cut out with a 2" circle punch) and mixed 1/2 glue with 1/2 shaving cream and let them "paint." They REALLY enjoyed this! When the mixture dries, it feels like foam. We once again chatted about how important feeling things is when you can't see, and they were able to feel the dots on their desks with their eyes closed!


I finished off by hanging their name posters on the bulletin board (cute, right?) and added the foam dots under my words "We can read by touch" to effectively make my bulletin board braille! I'm sure it's not perfect, but the kids have L-O-V-E-D this activity. I've already had firsties come by to ask if they get to make one next year!